How Thermal Imaging Finds Hidden Energy Problems
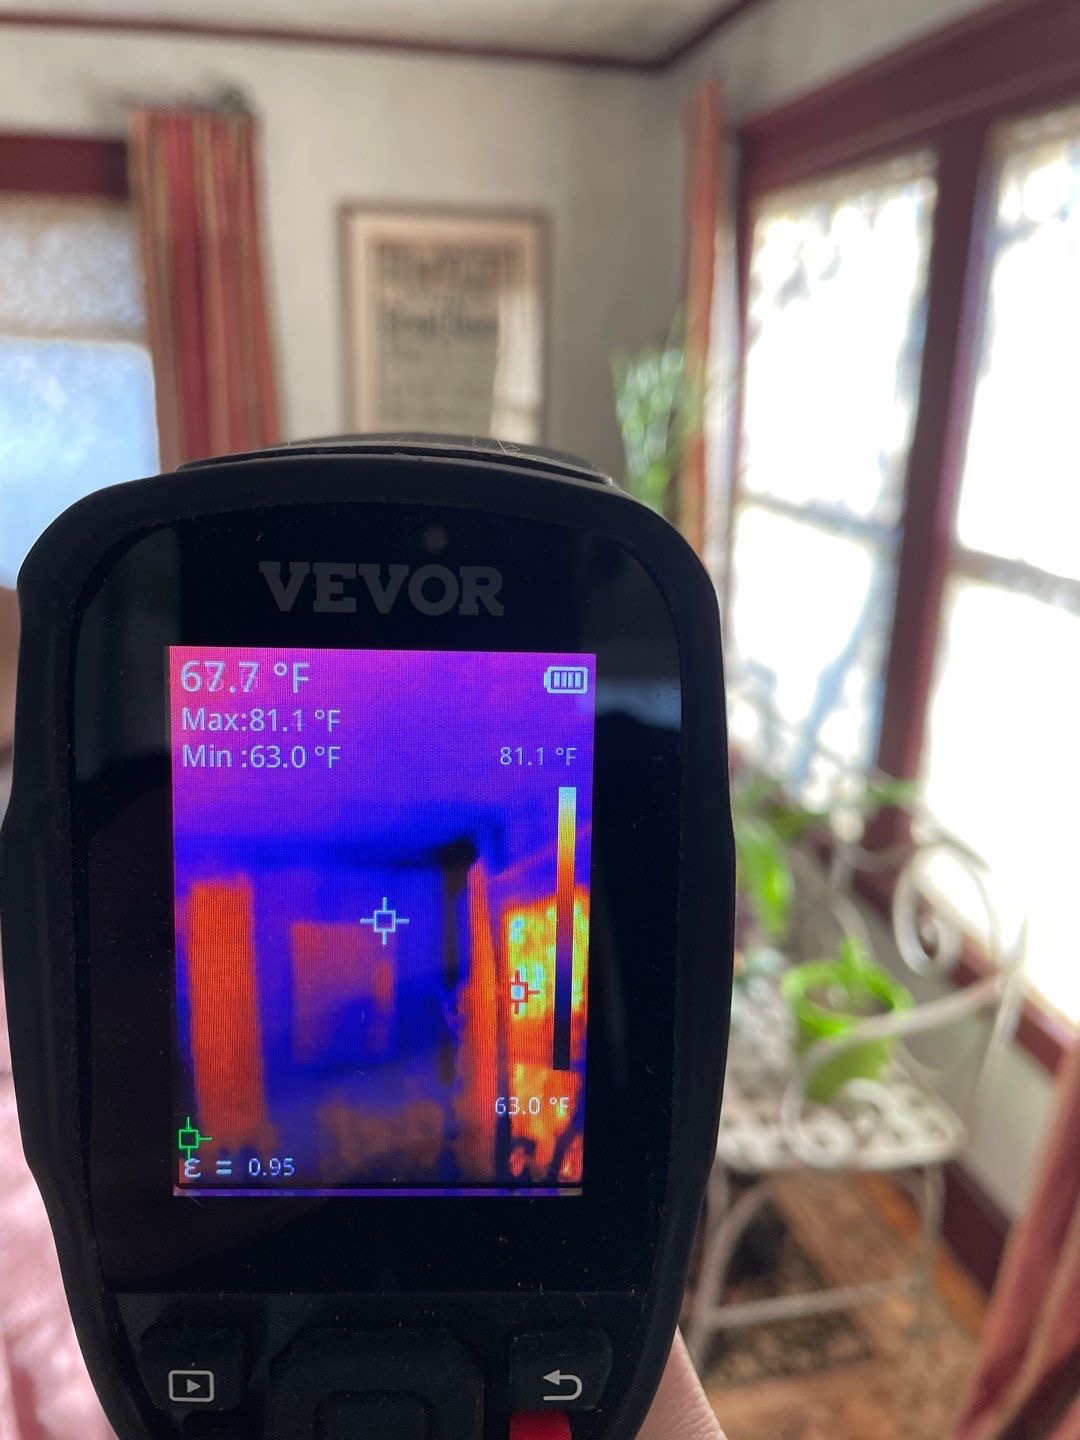
Last January, we were air sealing an attic in a 1950's colonial in Portland when our crew lead pointed his infrared camera at a section of exterior wall on the second floor. The homeowner was standing right there. On the camera's screen, the wall showed a bright blue rectangle - cold surface - surrounded by warmer yellow and orange areas. "See that?" he said. "That's a stud bay with no insulation. The ones around it are filled. That one got missed."
The homeowner looked at the wall. To the naked eye, it looked exactly the same as every other section of drywall in the room. Same paint, same texture, same temperature to the touch (or so he thought). But the infrared camera told a completely different story. That single empty wall cavity was bleeding heat to the outside, and it had been doing it for 70 years.
This is what thermal imaging does. It makes invisible energy problems visible.
What Infrared Cameras Actually Show
An infrared (IR) camera does not see through walls. This is one of the most common misunderstandings. What it does is detect surface temperature differences. Every surface in your home radiates heat, and an IR camera translates those temperature variations into a color-coded image.
Warm surfaces show up as red, orange, or yellow. Cool surfaces show up as blue or purple. And the patterns those colors form tell a trained eye exactly what is happening inside the wall, ceiling, or floor.
Here is what we commonly identify with thermal imaging during our work on Maine homes:
Missing or Settled Insulation
This is the most frequent finding. In homes built before the 1980's, wall insulation (if it was installed at all) was typically fiberglass batts cut to fit between studs. Over decades, those batts can settle, compress, or shift - leaving gaps at the top of wall cavities where there is no insulation at all.
On an IR camera, these gaps show up as cold spots in a clear, repeatable pattern. You will see cooler patches at the tops of exterior walls, or you will see individual stud bays that are noticeably colder than their neighbors. The contrast is unmistakable once you know what to look for.
Air Leaks
Air infiltration creates distinct thermal signatures. When cold outdoor air leaks into a home through gaps around windows, electrical outlets, plumbing penetrations, or the attic hatch, the IR camera shows streaks or plumes of cold air spreading across interior surfaces.
These patterns are different from insulation voids. Insulation problems create broad, uniform temperature differences. Air leaks create irregular streaks that follow the path of airflow - often fanning out from a specific entry point.
Some of the most common air leak locations we identify with IR cameras:
- Attic hatches and pull-down stairs - Often the single largest air leak in the home
- Recessed light fixtures - Older can lights are open to the attic above
- Plumbing and wiring penetrations - Every pipe and wire that passes through a ceiling or wall creates a potential air pathway
- Band joist areas - Where the floor framing meets the foundation wall, gaps are almost universal in older homes
- Knee wall connections - In Cape Cod-style homes, the junction between knee walls and rafter cavities leaks badly
Moisture Intrusion
Wet building materials have different thermal properties than dry ones. When moisture accumulates inside a wall or ceiling - from a roof leak, condensation, or plumbing issue - the IR camera often detects it before any visible stain or damage appears on the surface.
This is particularly valuable in Maine, where ice dams can force water into roof and wall cavities during winter. By the time you see a water stain on your ceiling, the moisture has been there for a while. Thermal imaging can catch the problem earlier.
Thermal Bridging
Framing members (studs, joists, rafters) conduct heat faster than the insulation between them. On an IR camera, you can often see the outline of every stud in an exterior wall because each stud creates a slightly warmer or cooler line compared to the insulated cavities beside it.
Thermal bridging is not a defect - it is a physical reality of wood-frame construction. But understanding where it occurs helps us prioritize improvements and set realistic expectations about what insulation upgrades can achieve.
When We Use Thermal Imaging
This is an important distinction that we want to be transparent about. Thermal imaging is not part of our free energy assessment. The free assessment is a visual walkthrough where we look at your home's insulation, air sealing, heating system, and comfort issues - no equipment involved.
We use infrared cameras during the actual work. Here is when and why:
During Air Sealing
When our crew is in the attic or basement performing air sealing work, the IR camera helps them target the specific spots where air is moving. Instead of guessing where leaks might be, they can see exactly where cold air is entering and focus their sealing efforts on the gaps that matter most.
Verifying Insulation Installation
After we blow in cellulose insulation, thermal imaging lets us verify that every cavity is filled completely. Dense-pack wall insulation, for example, is installed through small holes drilled from the exterior. Once the holes are patched, you cannot see inside the wall. But the IR camera confirms that every stud bay is filled uniformly, with no voids or gaps.
Quality Assurance After the Job
We use thermal imaging as a final check after completing work. This is paired with our post-work blower door test - the blower door pressurizes the house to measure total air leakage, and the IR camera shows us where any remaining leaks are located. Together, these tools let us verify that the improvements we made are performing as intended.
Diagnosing Comfort Complaints
Sometimes homeowners have specific rooms that are always cold, or walls that feel drafty. Before starting any work, a quick IR scan can identify the root cause. Is it missing insulation? An air leak? Thermal bridging from a steel beam? Each problem has a distinct thermal signature.
What Thermal Imaging Cannot Do
It is worth being honest about the limitations:
- It does not see through walls. It reads surface temperatures. A skilled technician interprets those readings, but the camera does not produce X-ray images.
- Conditions matter. Thermal imaging works best when there is a significant temperature difference between indoors and outdoors - at least 15 to 20 degrees Fahrenheit. In Maine, this is rarely a problem from October through April. In July, the temperature differential may not be enough to produce clear results.
- It does not measure R-value. The camera can show that one wall section is colder than another, but it cannot tell you the exact R-value of the insulation inside. It identifies relative differences, not absolute values.
- Surface obstructions block the reading. Furniture against walls, insulation facing the camera, or reflective surfaces can produce misleading results. Proper scanning technique accounts for these factors.
The Technology Behind It
Modern IR cameras used in building diagnostics typically detect temperature differences as small as 0.1 degrees Fahrenheit. The cameras we use in the field are purpose-built for building science applications - they produce high-resolution images that clearly show the thermal patterns across walls, ceilings, and floors.
The images are captured digitally, and we can overlay them with standard photographs to show homeowners exactly which part of their home corresponds to which thermal pattern. This makes the findings easy to understand even if you have never seen a thermal image before.
How This Fits Into Our Process
At Horizon Homes, thermal imaging is one tool in a larger diagnostic approach. It works alongside blower door testing, visual inspection, and 20+ years of experience working with Maine's housing stock since 2006.
The blower door test tells us how much air leakage the home has overall. The IR camera tells us where that leakage is happening. Together, they give us a complete picture.
Here is how the process typically flows:
- Free energy assessment - Visual walkthrough, identify problem areas and priorities, provide an estimate. No equipment used at this stage.
- Day of work - initial blower door test - Pressurize the home to measure baseline air leakage (CFM50).
- IR scan - With the house under pressure, scan walls, ceilings, and floors to identify air leak locations and insulation gaps.
- Air sealing - Target the specific leaks identified by blower door and IR, starting with the largest ones.
- Insulation - Blow in cellulose insulation in attics, walls, and basements as needed.
- Post-work blower door test - Measure again to verify improvement and quantify the reduction in air leakage.
- Final IR scan - Confirm all cavities are filled, all major leaks are sealed, and the work meets our standards.
Why It Matters for Your Home
You do not need to understand the technical details of infrared imaging to benefit from it. What matters is that the contractor doing your weatherization work has the tools and training to identify problems that are invisible to the naked eye - and to verify that the work they perform actually solves those problems.
Too many insulation projects are done by feel or by assumption. The attic looks thin, so they blow in more. The walls feel cold, so they dense-pack them. But without diagnostics, you cannot know whether every cavity got filled, whether the real air leaks got sealed, or whether the work actually improved the home's performance.
Thermal imaging removes the guesswork. It shows us what is happening inside your building envelope, guides our work to the areas that need it most, and confirms the results when we are done.
If you are curious about what a thermal scan might reveal in your home, the first step is a free energy assessment. We will walk through your home, discuss what you are experiencing, and put together a plan. The diagnostic tools - including thermal imaging - come into play when the work begins.
Schedule your free energy assessment or call (207) 221-3221. We serve Greater Portland and surrounding Maine communities from our office in Westbrook.
Find our guides faster: add Horizon Homes as a preferred source on Google.
Free Home Energy Assessment
Ready to Lower Your Energy Bills?
We identify the improvements that will have the biggest impact on your home's energy use, with clear pricing and rebate estimates.
- Free walkthrough, no equipment, no disruption
- Rebates up to $18,100 identified for you
- Written improvement plan with pricing
Schedule Your Free Assessment
We call within 1 business day.