Ice Dam Prevention Starts in the Attic
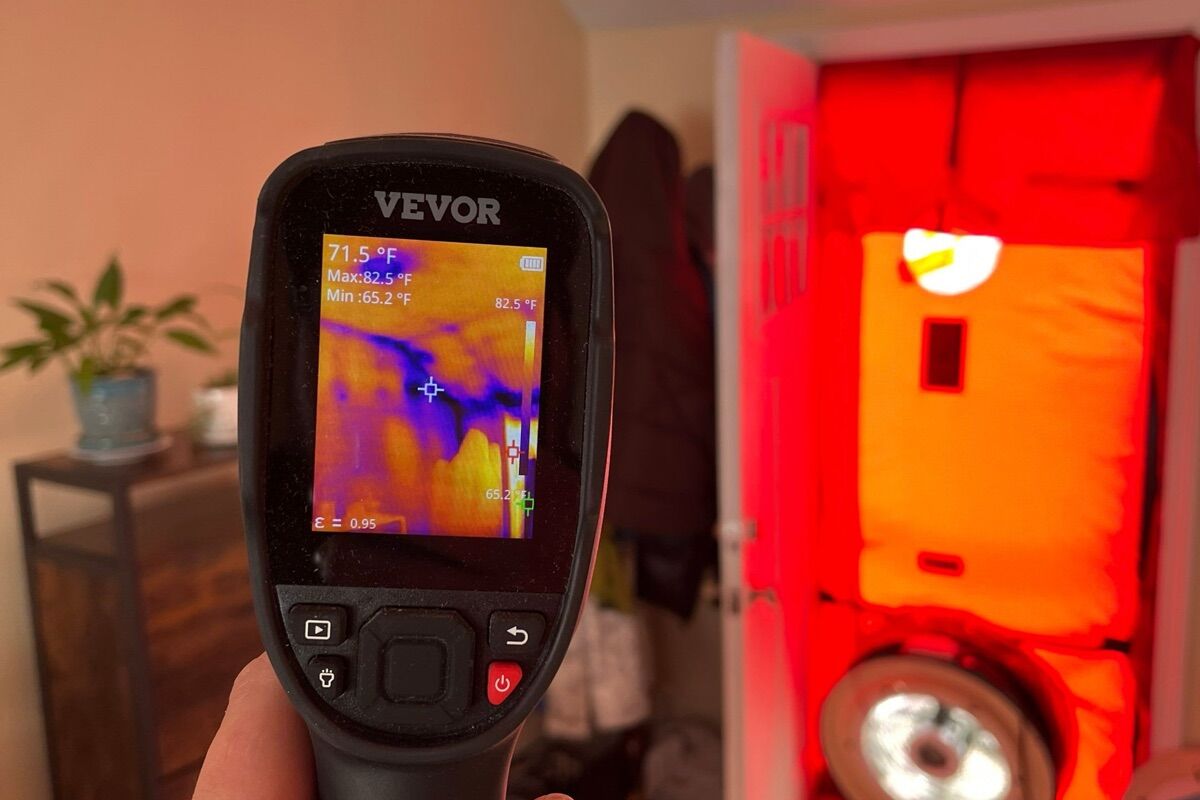
When we go into an attic on a January ice dam call, the answer is usually visible within the first few minutes. Four inches of compressed cellulose over the problem area. Gaps around every light fixture. An unsealed attic hatch radiating heat like an open window. The attic floor is warm to the touch on a 15-degree day. That warmth is melting snow on the roof deck above, and the meltwater refreezes the moment it reaches the cold overhang.
Ice dams are not a roof problem. They are an attic problem. And the fix is not on the roof - it is underneath it.
Why Ice Dams Are Really an Attic Problem
The mechanics are simple once you see them. Heat escapes from your living space into the attic through air leaks and thin insulation. That heat warms the underside of the roof deck. Snow on the warmed section of the roof melts. The meltwater flows downhill until it reaches the eaves - the unheated overhang where the roof extends past the exterior wall. There, it refreezes. Day after day, the ice builds up. Eventually the dam is thick enough to trap water behind it, and that water backs up under the shingles and into your home.
Three things have to be true for ice dams to form:
- Heat is reaching the roof deck. Through air leaks, insufficient insulation, or both.
- Snow is sitting on the roof. The snow acts as an insulating blanket that traps the heat against the roof surface.
- The eaves are cold enough to refreeze meltwater. This is almost always the case in Maine winters, since eaves extend beyond the heated envelope.
You cannot control the snow. You cannot control the temperature at the eaves. But you can control how much heat reaches the roof deck. That is the only variable that actually solves the problem.
What Does Not Work (and Why People Keep Trying It)
Heat Cables
Electric heat cables zigzag along the roof edge and through gutters. The idea is to melt channels through the ice so water can drain. In practice, they create narrow melt paths that often refreeze a few inches lower, shifting the ice dam rather than eliminating it. They also cost $200-$500 per year in electricity and do nothing to address the heat loss that caused the problem.
Heat cables are a band-aid on a symptom. They treat the ice without touching the cause.
Roof Raking
Pulling snow off the lower 3-4 feet of your roof with an aluminum rake can reduce ice dam formation in the short term. But it only works if you do it after every snowfall, it risks damaging shingles, and it does nothing during freezing rain events or extended cold snaps when the melt-refreeze cycle happens faster than you can rake.
Roof raking is maintenance, not a solution. You will be doing it every winter for as long as you own the house.
Ice and Water Shield
This membrane installed under shingles prevents water damage when ice dams back up. Worth installing during a roof replacement, but it does not prevent ice dams from forming. The ice will still be there.
More Ventilation (Without Air Sealing)
Adding roof vents can help flush warm air from the attic. But ventilation alone cannot overcome a major heat source. If your attic has dozens of air leaks pumping warm air upward, adding vents is like opening a window in a room with the heater running. Ventilation works best after air sealing controls the heat source.
The Attic-First Fix: Air Seal, Then Insulate
The permanent solution to ice dams involves two steps, done in the right order.
Step 1: Air Seal the Attic Floor
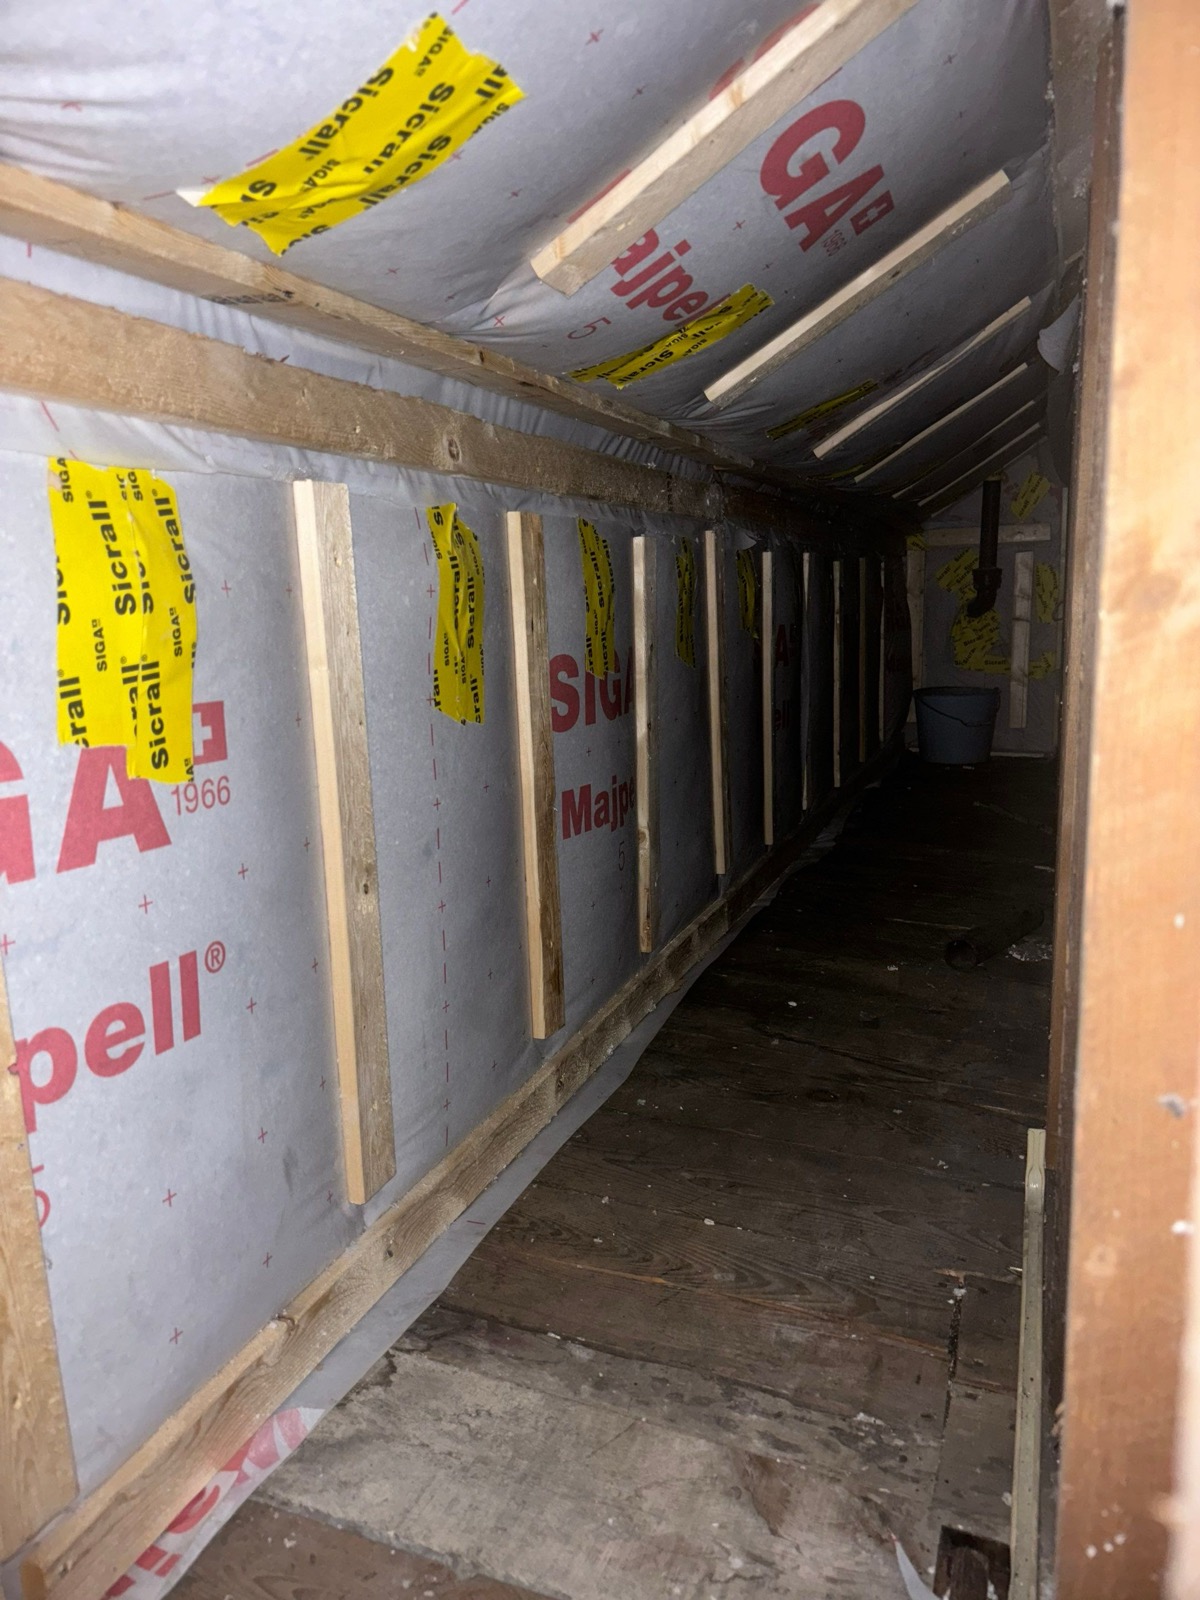
Before adding any insulation, the attic floor needs to be air sealed. This means identifying and closing every pathway where warm air from your living space can leak into the attic:
- Recessed light fixtures. Older can lights are often open to the attic. Each one acts like a small chimney, venting warm air straight up.
- Plumbing and electrical penetrations. Every pipe, wire, and duct that passes through the attic floor creates a gap. These gaps need to be sealed with fire-rated caulk or expanding foam.
- The attic hatch or pull-down stairs. This is frequently the single biggest air leak in the attic. An unsealed attic hatch can leak more air than a dozen recessed lights combined.
- Top plates of interior walls. The framing at the top of your interior walls often has gaps where it meets the attic floor, especially in older homes with balloon framing.
- Chimney and flue chases. The gap around a masonry chimney or metal flue pipe requires fire-rated materials, but it absolutely needs to be sealed. These openings can be 1-2 inches wide and run the full perimeter of the chase.
- Ductwork boots. Where HVAC ducts pass through the attic floor, the gaps around the boot (the metal housing) need sealing.
This is painstaking work. A typical attic might have 30-50 individual air leak points that each need to be addressed. But air sealing is what stops the warm air from reaching the attic in the first place. Without it, even R-60 insulation will still allow enough heat transfer through convective air movement to cause ice dams.
At Horizon Homes, we run a blower door test before and after every project to measure the actual air leakage reduction. This is not guesswork - it is verified performance.
Step 2: Insulate to R-50 (Minimum)
Once the attic floor is sealed, the next step is insulating to at least R-50. The current Maine building code for new construction requires R-49 in attic spaces, and R-50 is our standard target for retrofit work.
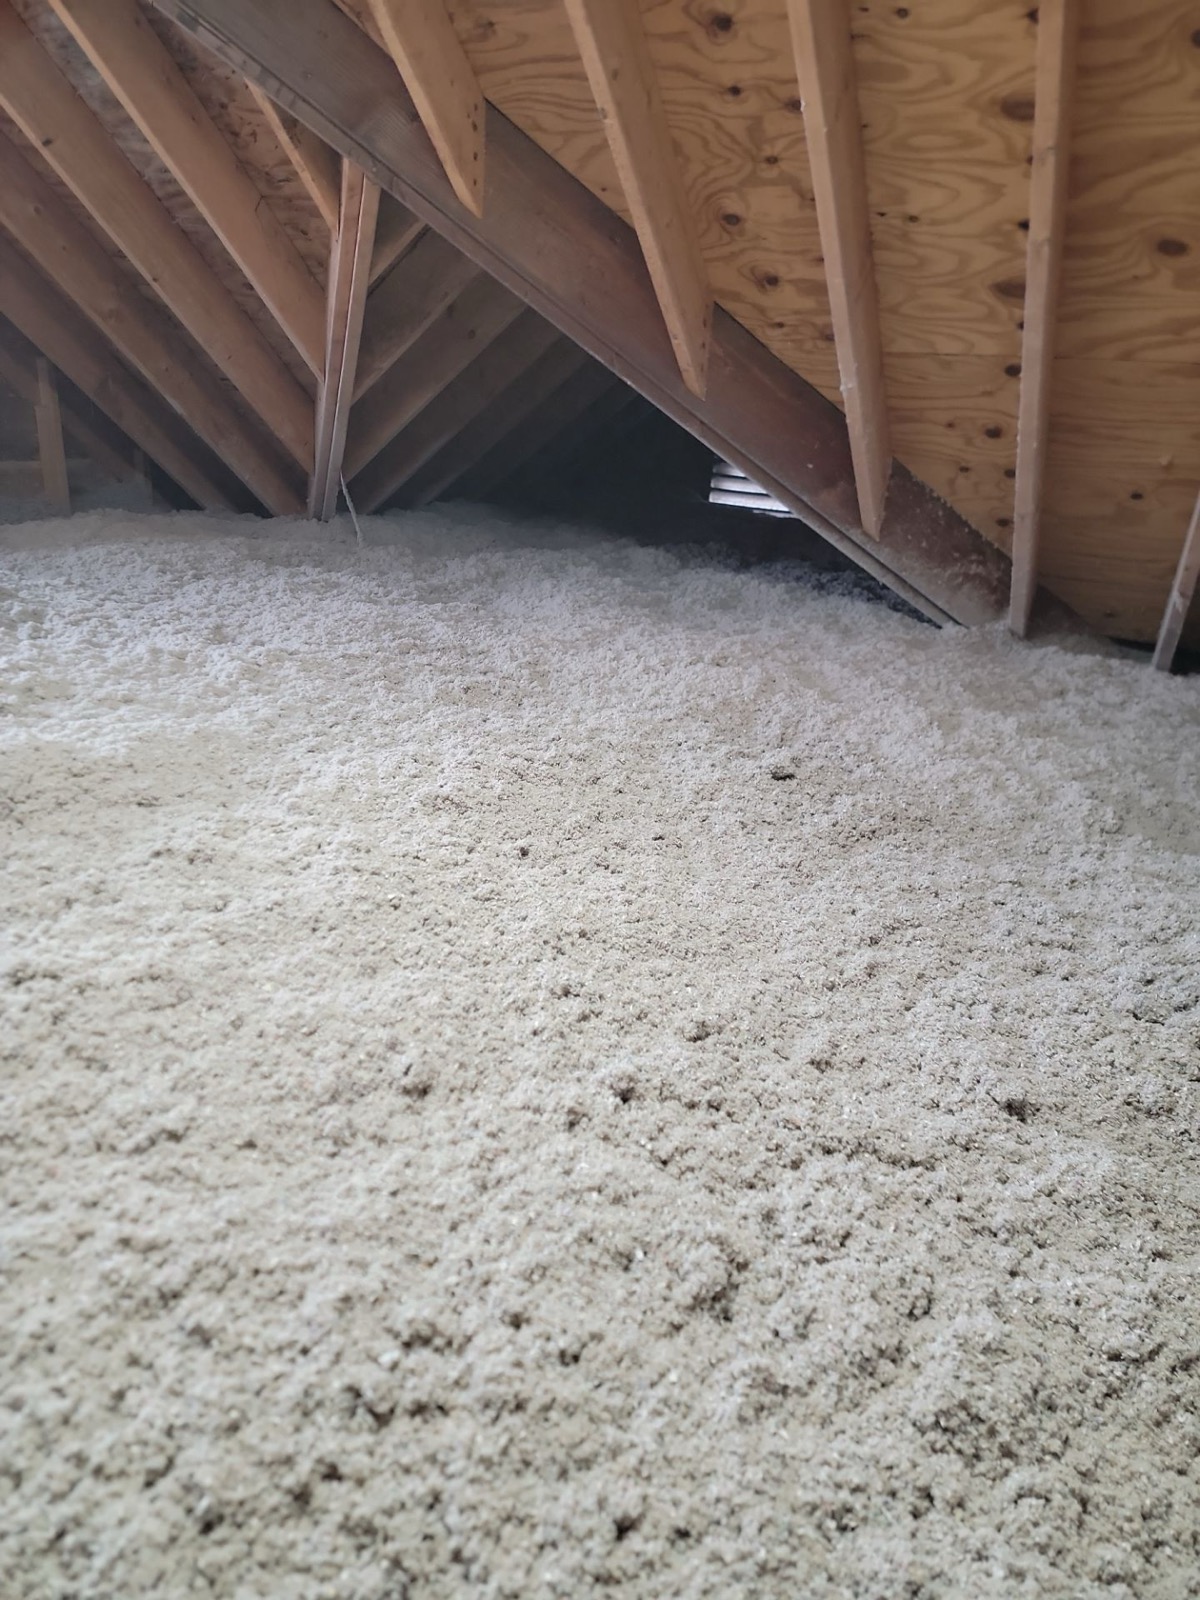
What does R-50 mean in practice? With blown-in cellulose insulation, it means approximately 14-16 inches of material, evenly distributed across the entire attic floor. No thin spots. No gaps around framing. No compressed areas where someone stored boxes or walked a path through the existing insulation.
We use cellulose for attic insulation because it performs well in this application. It fills irregular cavities, settles around framing and obstructions, and has a Class 1 fire rating. Cellulose is made from 85% recycled newspaper treated with borate for fire resistance and pest deterrence.
Most homes we see in Greater Portland have somewhere between 3 and 8 inches of existing insulation in the attic - often a mix of old cellulose and fiberglass batts that have compressed, shifted, or been disturbed over the decades. Going from R-12 (about 3 inches of compressed material) to R-50 makes a measurable difference in how much heat reaches the roof deck.
Why the Order Matters
Insulating without air sealing is a common mistake. Insulation slows heat transfer through conduction - it resists heat moving through the material itself. But insulation does very little to stop air movement. Warm air carrying moisture can flow right through or around insulation if there are gaps and openings in the attic floor.
Think of it this way: insulation is a sweater. Air sealing is a windbreaker. In a Maine January, the sweater alone is not enough. You need both, and the windbreaker matters more than most people think.
What to Expect During an Attic Project
The process is less disruptive than most homeowners expect. We start with a free energy assessment to scope the work. On project day, our crew air seals the attic floor (2-4 hours), then installs blown-in cellulose to the target depth using pneumatic equipment (2-3 hours). We run a blower door test before and after to verify the improvement. Most projects are completed in a single day.
How Much Does It Cost - and What Do Rebates Cover?
A comprehensive attic air sealing and insulation project for a typical Greater Portland home runs $4,000-$8,000 depending on attic size, accessibility, and the amount of existing insulation that needs to be managed.
Efficiency Maine rebates cover 40-80% of the cost depending on household income:
- All homeowners: Up to 40% of costs, maximum $4,000
- Moderate-income: Up to 60%, maximum $6,000
- Low-income: Up to 80%, maximum $8,000
At Horizon Homes, we deduct the rebate directly from your invoice. You pay only the net cost - no waiting weeks for a reimbursement check. We have been an Efficiency Maine Top Contractor for 10+ years, and we handle the paperwork.
For a $6,000 attic project with a $3,600 rebate (60% at moderate income), your out-of-pocket cost is $2,400. That is less than what many homeowners spend on heat cables and annual roof raking over a five-year period.
See our full guide to Efficiency Maine rebates for current amounts and eligibility.
What Changes After the Work Is Done
Fourteen inches of cellulose over a fully sealed attic floor changes more than the roofline. The dining room ceiling stays dry. Ice along the eaves drops to the minimal amount that forms on any Maine roof from solar melt, not from interior heat loss.
The changes most people notice first are not the ice dams at all. Upstairs bedrooms are warmer. The furnace cycles less. The January heating bill drops by 25-35% compared to the same month the prior year.
That is the thing about fixing ice dams the right way: you are not solving a roof problem in isolation. You are fixing the building envelope. Comfort, energy costs, moisture control - all of it improves along with it.
Next Steps
If you are seeing ice dams on your roof this winter, start with the attic. Call us at (207) 221-3221 or schedule a free energy assessment. We will look at your attic, identify where heat is escaping, and tell you exactly what it would take to fix it - along with what Efficiency Maine rebates can offset the cost.
Horizon Homes has been solving ice dam problems in Greater Portland since 2006. The fix is not on the roof. It is underneath it.
Find our guides faster: add Horizon Homes as a preferred source on Google.
Free Home Energy Assessment
Dealing With This in Your Home?
Most comfort problems trace back to insulation, air sealing, or heating system issues. A free walkthrough identifies the root cause.
- Free walkthrough, no equipment, no disruption
- Rebates up to $18,100 identified for you
- Written improvement plan with pricing
Schedule Your Free Assessment
We call within 1 business day.