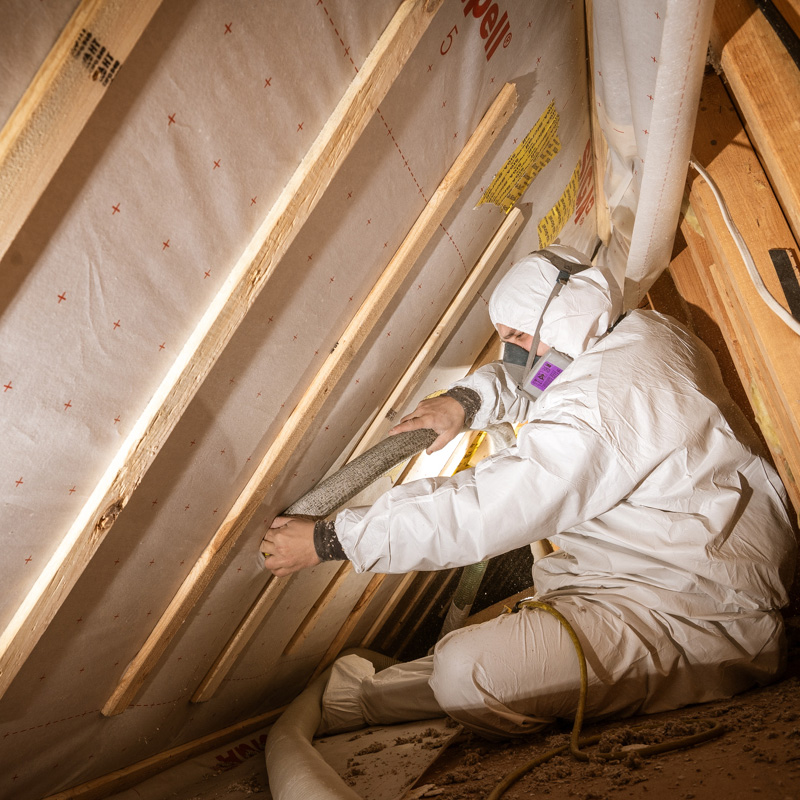
Crawlspace Insulation and Encapsulation in Maine
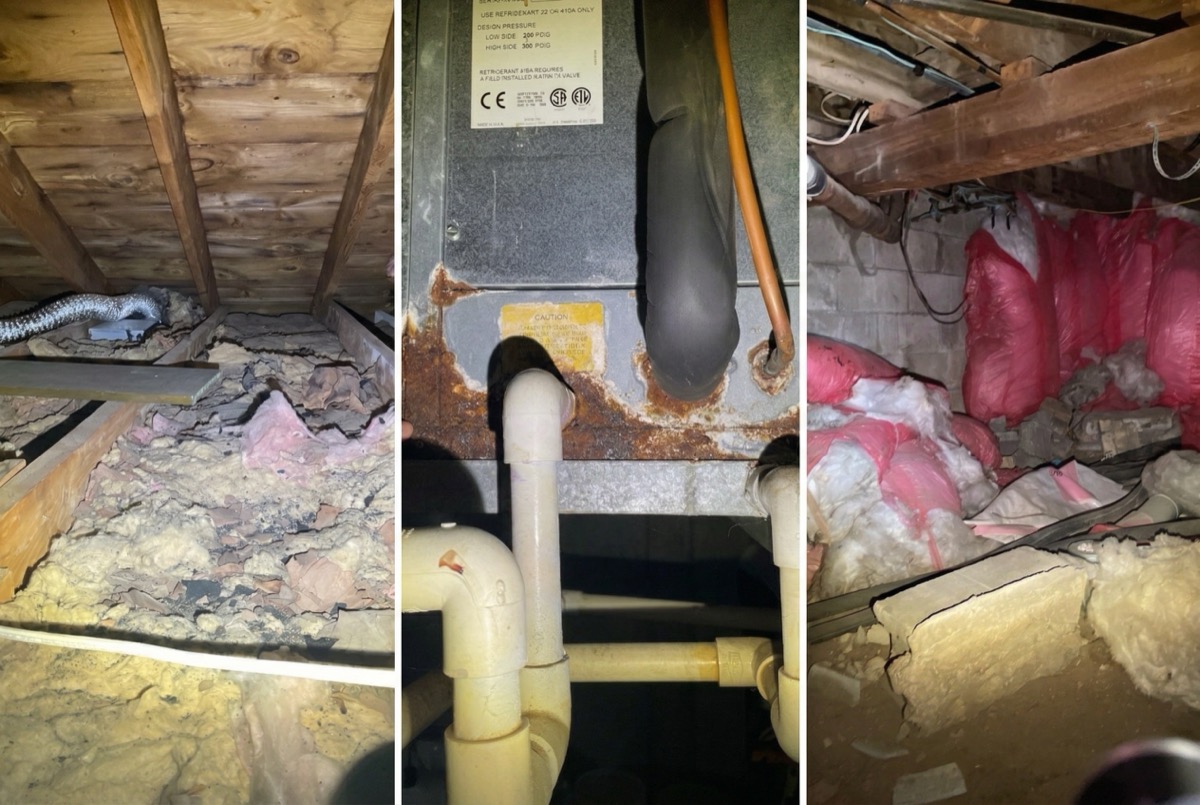
We were under a ranch house in Gorham last spring, belly-crawling through a crawlspace with about 18 inches of clearance. The fiberglass batts that someone had stapled between the floor joists overhead were hanging down in sheets - damp, sagging, and covered with mouse droppings. A puddle of standing water sat in the low corner near the foundation vent. The homeowner above us was complaining that her kitchen floor was so cold in winter that her kids wore slippers year-round.
This is what most Maine crawlspaces look like after 30 or 40 years of neglect. They are out of sight, difficult to access, and easy to ignore. But a crawlspace in poor condition directly affects the comfort, energy efficiency, and air quality of the home above it. Studies consistently show that 40-50% of the air you breathe on the first floor of your home has cycled up from the crawlspace below. If that space is damp, moldy, and uninsulated, those problems travel upward.
This guide covers both approaches to crawlspace insulation in Maine - encapsulation (our recommended method) and the traditional vented approach - along with the step-by-step process for each.
Two Approaches: Encapsulated vs. Vented
Before getting into the installation steps, it is important to understand the two fundamentally different ways to treat a crawlspace. The approach you choose determines where the insulation goes and how moisture is managed.
Vented Crawlspace (Traditional)
The traditional approach treats the crawlspace as outdoor space. Foundation vents remain open, the crawlspace floor is left exposed to earth, and insulation is installed in the floor above (between the floor joists) to separate the cold crawlspace from the heated living space.
This was standard practice for decades, and it is based on the idea that ventilation would keep the crawlspace dry. In practice, it fails badly in Maine. Summer humidity pours through the open vents and condenses on the cool surfaces inside the crawlspace. The fiberglass batts between the joists absorb moisture, sag, and eventually fall out. The crawlspace stays damp, cold, and problematic.
Encapsulated Crawlspace (Recommended)
Encapsulation treats the crawlspace as part of the conditioned space of the home. Foundation vents are sealed shut. A heavy vapor barrier covers the floor and runs up the walls. The foundation walls (not the floor above) are insulated. The crawlspace air is connected to the home's conditioned air through a small supply register or dehumidifier.
This approach is consistent with current building science and performs dramatically better in Maine's climate. The crawlspace stays dry, the floor above stays warm, and the energy savings are significant.
Step 1: Clean and Prepare the Crawlspace
Before any insulation or encapsulation work begins, the space needs preparation.
Remove debris. Old insulation, fallen batts, construction debris, stored items - everything comes out. We need a clean surface to work with, and removing old fiberglass that has been collecting moisture for decades improves air quality immediately.
Address standing water. If water is actively entering the crawlspace, the source must be identified and corrected. Common causes include:
- Poor exterior grading (ground slopes toward the foundation)
- Missing or disconnected gutters and downspouts
- High water table requiring a sump pump
- Foundation cracks allowing surface water entry
We do not proceed with encapsulation until bulk water is managed. Sealing moisture inside an encapsulated space defeats the purpose entirely.
Check for structural issues. While we are down there, we look at the condition of the floor joists, sill plate, and any support posts or beams. Moisture damage to structural members needs to be addressed before encapsulating.
Pest assessment. Crawlspaces are prime habitat for mice, insects, and occasionally larger visitors. Signs of active pest activity should be addressed before sealing the space. Encapsulation itself is a strong pest deterrent - sealing the floor and walls eliminates the damp, earth-floor conditions that attract pests in the first place.
Step 2: Install the Vapor Barrier
The vapor barrier is the foundation of a crawlspace encapsulation. It covers the entire floor and runs up the foundation walls to create a sealed envelope that separates the earth and exterior from the crawlspace interior.
Materials
We use a reinforced polyethylene vapor barrier rated at 12 mil or heavier. This is not the thin 6-mil plastic sheeting sold at hardware stores - that material tears easily, does not lay flat, and degrades within a few years. Professional-grade encapsulation material is durable enough to crawl on without tearing and comes with a 25-year warranty.
Installation Process
Floor coverage. The vapor barrier is laid across the entire crawlspace floor, overlapping seams by 12 inches minimum. Seams are sealed with vapor barrier tape rated for long-term adhesion in below-grade conditions.
Wall coverage. The barrier extends from the floor up the foundation walls to a termination point 3-6 inches below the top of the concrete (leaving the sill plate area visible for termite inspection, which is required by code in most jurisdictions). The barrier is mechanically fastened to the wall with concrete fasteners and sealed along the top edge.
Column and pier wraps. Any support posts or piers within the crawlspace are wrapped individually, with the barrier sealed around the base.
Sealed to structure. The goal is a continuous, sealed vapor barrier that prevents ground moisture from entering the crawlspace air. Every seam, edge, and penetration is sealed.
Step 3: Seal Foundation Vents
Open foundation vents are sealed from the interior using rigid foam board cut to fit the vent opening, adhered with construction adhesive, and sealed around the edges with canned spray foam. From the outside, vent covers can be added for a clean appearance.
Sealing the vents eliminates the pathway for humid outdoor air to enter the crawlspace in summer and cold air to enter in winter. This single step often makes a noticeable difference in crawlspace conditions within days.
Step 4: Insulate the Foundation Walls
With encapsulation, insulation goes on the foundation walls - not in the floor above. This brings the crawlspace inside the thermal envelope of the home.
For Poured Concrete or Block Foundations
We install polyiso rigid foam board (1.5 to 2 inches) against the foundation walls, from the top of the concrete down to the floor. The foam is adhered with construction adhesive and sealed at all seams with foil tape. The vapor barrier from the floor overlaps the bottom edge of the foam, creating a continuous moisture seal from floor to wall to insulation.
For Rubble Stone Foundations
Rubble stone crawlspace walls cannot accept flat rigid foam. For these situations, we subcontract closed-cell spray foam application. The spray foam conforms to the irregular stone surface, fills voids, and provides insulation and an air/vapor barrier in one step. Typical application is 2-3 inches, providing R-12 to R-18.
Spray Foam on the Subfloor (Subcontracted)
In some crawlspaces - particularly those that are too shallow for full encapsulation or where the homeowner prefers to leave the crawlspace outside the thermal envelope - spray foam applied directly to the underside of the subfloor (between the floor joists) is an effective alternative. This work is subcontracted to spray foam specialists.
Closed-cell spray foam on the subfloor provides insulation, air sealing, and a vapor barrier all in one application. It adheres directly to the wood and does not sag or fall out like fiberglass batts. For crawlspaces under 24 inches of clearance where encapsulation is impractical, this is often the best option.
Step 5: Condition the Air
An encapsulated crawlspace needs a way to manage humidity and maintain reasonable temperatures. There are two common approaches:
Supply register from HVAC system. A small duct from the home's heating system provides conditioned air to the crawlspace. This keeps the space warm in winter and dry in summer. The air volume needed is modest - typically 1 CFM per 50 square feet of crawlspace area.
Standalone dehumidifier. A commercial-grade dehumidifier designed for crawlspace conditions maintains humidity below 60% year-round. This approach works well in homes without ducted heating systems or where extending ductwork is impractical.
Either approach is dramatically more effective than foundation vents at controlling moisture, and the energy cost is minimal compared to the efficiency gains from encapsulation.
Pest Prevention Benefits
Encapsulation is one of the most effective pest prevention strategies for crawlspaces. The sealed vapor barrier eliminates the damp, earth-floor conditions that attract insects, mice, and other pests. Sealed vents remove entry points. A dry, clean crawlspace is far less hospitable to the carpenter ants, termites, powder post beetles, and rodents that thrive in traditional vented crawlspaces.
Some pest control companies in Maine actually recommend encapsulation as a first step in crawlspace pest management programs. It does not replace targeted pest treatment when active infestations are present, but it removes the conditions that invited the pests in the first place.
What It Costs
Crawlspace encapsulation costs depend on the size of the crawlspace, accessibility, foundation type, and whether moisture remediation is needed:
- Basic encapsulation (vapor barrier, vent sealing, wall insulation): $4,000-$8,000
- Full encapsulation with dehumidifier: $6,000-$12,000
- Spray foam on subfloor (subcontracted, non-encapsulated approach): $3,000-$6,000
- Rubble stone spray foam (subcontracted): $4,000-$8,000
Efficiency Maine rebates cover 40-80% of insulation costs for qualifying homeowners. Rebate amounts are income-dependent. We manage the rebate application and deduct the amount from your invoice.
Federal tax credits (25C) provide 30% of costs up to $1,200 per year for insulation work.
Energy savings from crawlspace encapsulation typically run 15-25% of heating costs, with the added benefits of warmer floors, drier air, and better indoor air quality throughout the home.
Schedule a Free Energy Assessment
Horizon Homes has been working in Maine crawlspaces since 2006. With 20+ years of experience, we have seen every type of crawlspace condition that Greater Portland homes can present - from dry, accessible spaces that need basic encapsulation to 12-inch-clearance rubble-stone nightmares that require creative solutions.
A free home energy assessment includes a thorough evaluation of your crawlspace. We will assess moisture conditions, check the foundation type, evaluate accessibility, and recommend the right approach for your specific situation.
Call (207) 221-3221 or schedule your free energy assessment online.
Related Guides
- Basement Wall Insulation Guide for Maine - For full-height basements
- Insulating Floors Over Unconditioned Spaces - When insulating from below is the approach
- Rim Joist Insulation Guide for Maine Homes - The critical junction above the foundation
- Attic Floor Insulation Guide for Maine Homes - Complete the envelope from top to bottom
Find our guides faster: add Horizon Homes as a preferred source on Google.
Free Home Energy Assessment
Wondering Where Your Home Is Losing Heat?
We walk through your home, identify insulation gaps and air leaks, and give you a prioritized plan with pricing and Efficiency Maine rebates.
- Free walkthrough, no equipment, no disruption
- Rebates up to $18,100 identified for you
- Written improvement plan with pricing
Schedule Your Free Assessment
We call within 1 business day.